Swords and Wizardry One Shot
A couple of summers ago, I ran a West Marches-style campaign for several of my coworkers called “Riverkeep”, using the Swords & Wizardry Complete rules. There’s a lot of prep work for that sort of campaign, even if you fill in most of the map with pre-existing modules as I did. On top of that, each session had between 8 and 12 players, which is a lot of fun, but also exhausting to run. As a result, the campaign only lasted a few months before going on indefinite hiatus, due to DM fatigue. (Note: I don’t blame the players at all. They were and are wonderful people.) A couple of weeks ago the subject came up in conversation again, and I offered to do a one shot session, unconnected to the previous campaign, for 3 to 6 players. I ended up getting four takers: a couple of campaign veterans who were already familiar with Swords & Wizardry; one guy who had played a bit of 4th and 5th Edition D&D and Dungeon World, but not any older rules; and one guy who had never played a table top RPG before, and whom I’d promised wouldn’t need to read any rules beforehand. We decided to play a single session of about four hours, and in order to make the most of our time, I’d bring several pregenerated characters for them to choose from.
Setting up
Since I didn’t have much time / didn’t want to do too much prep work, I looked around for a pre-existing module suitable for four characters of around level three, and came across Tomb of the Mummy Priest at the Basic Fantasy RPG site, which has some fantastic resources, even if you’re using a different set of old-school RPG rules. The only conversion I needed to do was from BFRPG’s ascending AC values to S&W’s descending system. That being done, I created a set of six characters for the four players to choose from, so that they’d each have at least three options. I made them a mix of classes, but avoided multiclass demihumans in order to keep things simple. I ended up with two human clerics, a human fighter, a dwarf fighter, a halfling thief, and a human magic-user. After rolling their attributes and making a few adjustments, I gave each 5,500 XP and added their prime requisite bonuses. That gave the clerics and the thief enough experience for level four, and the fighters and the magic-user enough for level three. Then I picked out equipment and spells, and was ready to start filling out character sheets.
I tried to find some existing form-fillable sheets, but couldn’t find any that I liked, and I also didn’t want to fill six sheets out by hand. Instead, I ended up creating the sheets using Keynote, which has surprisingly decent page-layout features. The six characters fit on three sheets of letter-sized paper, and then I used a fourth sheet for the magic-user’s spellbook and scroll. I also printed them out smaller sized with four characters to a page so I could keep track of them behind my DM’s screen (a binder and a manila folder with some tables taped to the inside).
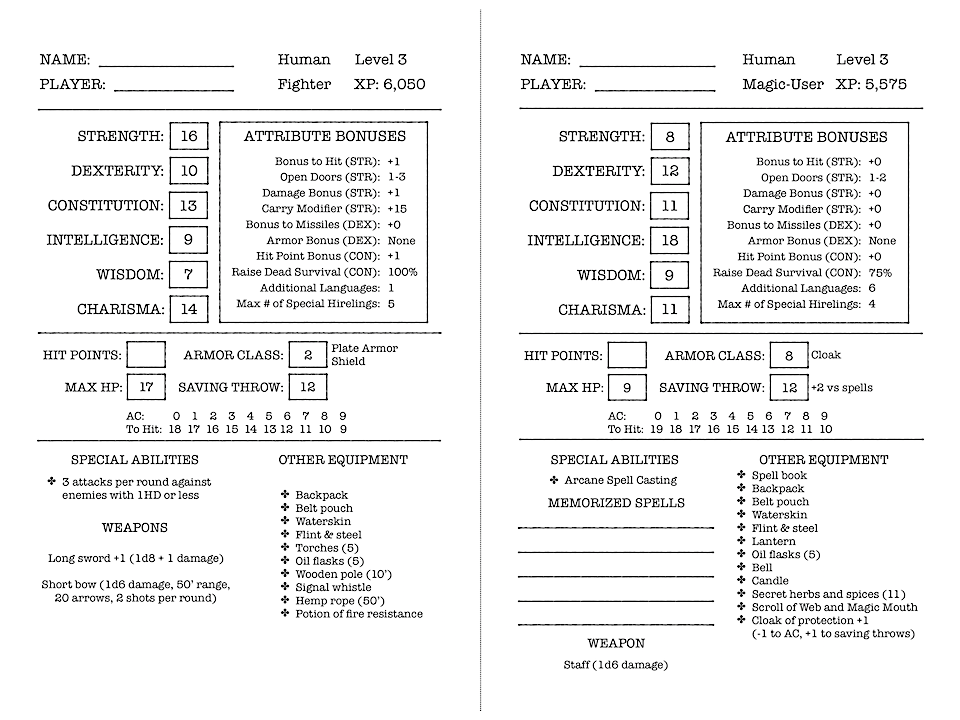
A couple of the characters. (Click for PDF)
The session
One of the players offered to host the game at his house, so on game day I headed over, binder, character sheets, dice, rule books1, and 17" x 22" pad of grid paper2 in tow. Once everyone had arrived, the players chose their characters and gave them names, and the spell casters picked their spells. I didn’t share the module name (Tomb of the Mummy Priest) with the players, but strongly hinted that they’d want at least one cleric, and I sort of expected them to also take either two fighters, or another cleric and a fighter, and either the thief or the magic-user. Instead, the party consisted of:
- Jora Orcsbane the Human Fighter, played by one of the campaign veterans who likes to keep it simple.
- Zur III the Human Cleric, played by the other veteran, and named after his two previous characters: Zur the Enchanter (a Ranger), and Zur’s Brother (also a Ranger).
- Xanders the Human Magic-User, played by the guy who’d only played newer editions before, and named after Colonel Sanders because of the 11 secret herbs and spices (spell components) I’d placed in his equipment list.
- Sticky Fingers the Halfling Thief, played by the new guy.
I was a little worried about the two newer players playing relatively low-HP specialists, but at least the magic-user had access to some decent spells, and the thief had bonuses from high dexterity and constitution and an additional +1 to hit with missiles. Not too shabby.
Then we got started. There’s some lengthy session notes containing spoilers ahead, so if you’d like to, you can skip to the end.
I gave the players a bit of background on their characters’ situation: They’d
recently been hired to escort a trade caravan on a route that took it through
the small village of Mudar, on the edge of a great desert. However, after a
misunderstanding between the characters and the caravan leader (something
about some coins and items that had gone missing), they’d been left in Mudar
while the caravan continued on without them. After overcoming the villages
initial distrust by blowing all their cash in the village
taverns with their generosity and good natures, the players learned a
couple of things about the area: (1) there’s supposedly an old abandoned
temple of a long-dead water deity hidden in a canyon, full of treasure, and
just a few hours ride out in the desert; and (2) several villagers have gone
missing in the night recently, and no one knows what’s happened to them.
Since we didn’t have a whole lot of time, we didn’t play out any of the town scenes, the journey to the canyon, or finding the tomb. I just placed the party at the entrance, and mentioned that they’d only found it because of all of the footprints leading in and out. A full session report would make this already lengthy post even longer, so here are some of the highlights:
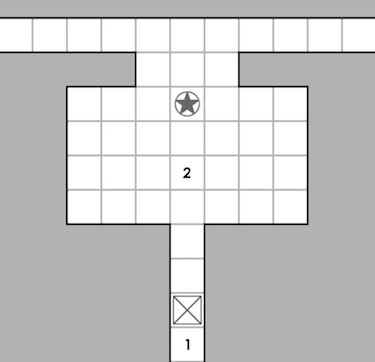
Entrance and main hall.
The thief entered first, staying close to the walls and trying to be quiet. That’s how he noticed how all the footprints went around a section of floor about 10’ down the passageway (area 1 on the map). The party investigated a bit, thinking it might have been a trigger for some sort of arrow trap, but moved on before figuring out it was a pit trap, with a recently reanimated corpse inside
The searched the entire main hall (area 2), and a little bit down each passageway before I rolled a 1 and the seven bandits arrived from the western passage. The party won the surprise roll, and quickly set up an ambush. The combat lasted only a couple of rounds, before they took the last surviving bandit hostage and got some exposition out of him.
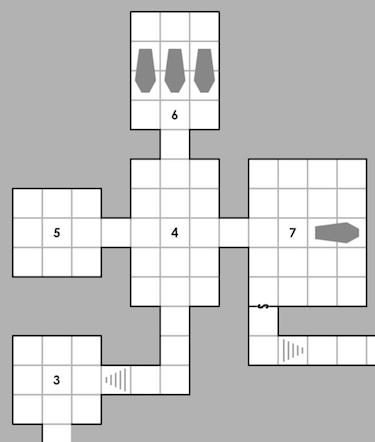
Storage and burial chambers.
Buoyed by this early success, the party made it’s way down the western passageway, through the now-abandoned sleeping quarters (area 3) and oil storage room (area 4). As they entered area 6, three mummified crocodiles emerged from their sarcophagi and attacked. This was a tougher fight than the one with the bandits, and the party had a tough time with their attack rolls, but eventually Zur managed to turn back the crocodiles, who retreated to the far side of their chamber. Xanders and Sticky Fingers improvised a trap in the entryway using a large jar of oil and a torch, reasoning that the crocodiles weren’t intelligent, and would likely knock over the jar and set themselves on fire if they tried coming after the party again.
Still feeling pretty confident at this point, they entered the burial chamber (area 7), where the module’s boss monster laid in wait. As they drew near the sarcophagus to get a better look at its hieroglyphics, Kutan Tahkmet, the titular Mummy Priest whose tomb the party were robbing, burst out and started attacking Jora. The module actually boosted the mummy’s stats from what the BFRPG manual lists, giving it darkness, cause fear, hold person, and resist fire spells. I just went with the base mummy stats from the Swords & Wizardry manual instead, figuring that would be challenge enough.
It turns out I was right, because after a few rounds of combat, the characters hadn’t managed to do very much damage to Kutan, but he’d reduced Jora to 0 hit points (unconscious, but stable) and given him a bad case of mummy rot to boot. After Zur’s cure light wounds spell failed to heal Jora, they started making escape plans. Xanders cast a web spell at the mummy, while Zur and Sticky Fingers pulled the comatose fighter to safety. They decided to head back to town to get some help for Jora, which ended up costing them the only treasure they’d found so far: a 600gp set of ruby earrings.
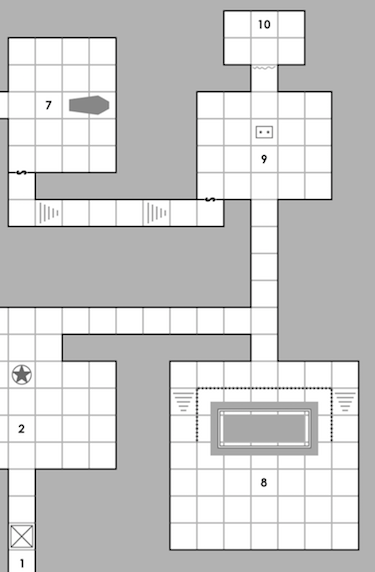
Down the eastern passageway.
When the party returned to the tomb after a couple of days, they found that the bodies of the bandits they had killed had been dragged from the main hall, down the eastern passageway. Scouting ahead, Sticky Fingers saw that the trail turned to the south, into area 8, where he noticed movement in the dark pool from the balcony above. Assuming it was more crocodiles (it wasn’t), and not seeing any obvious treasure, he decided to check to the north instead. In that direction, he saw a lit chamber with a bearded man at an altar, preparing to sacrifice a villager, and surrounded by robed figures.
Since they had the element of surprise, Xanders cast a sleep spell into the ritual chamber from the intersection just north of the pool room, which worked on seven of the twelve robed figures, and then the rest of the party rushed in to battle the remaining acolytes and their leader, Aram. After just a few rounds of combat, Aram was down to just 3 hit points and all of his followers had been slain. He surrendered to the player characters, who bound him with a rope, and were just about to start searching the room when Kutan Tahkmet made his entrance though the secret passage between areas 7 and 9.
The second battle with the mummy priest went only slightly better than the first, Jora and Zur were both afflicted with mummy rot, but still standing. Meanwhile, Xanders and Sticky Fingers tried to figure out a way to knock down one of the large oil lanterns that hung from the ceiling on top of the rampaging mummy, and they were all wondering just how many hit points it could possibly have. (It was 25.) Aram started shouting at the PCs, trying to get them to untie him so he could join the melee with his battleaxe +1, which they eventually agreed to do.
After a few more rounds, they managed to destroy Kutan, and the players all gave a sigh of relief. Aram immediately tried to run away down the secret passage to the burial chamber, Xanders hit him with a sleep spell before he could get very far. They searched the room and found all the treasure that had been stashed in the corners, and then discovered the five other prisoners still chained up in area 10. After a bit of discussion about what to do with Aram, they decided to turn him over to the captives, who dragged the bandit-turned-cultist down to the pool in area 8 and threw him in. The bodies he had been disposing of in the pool had returned to life, and tore Aram to pieces as the party gathered up all the treasure they could carry and made their exit.
Conclusion
I hadn’t run Tomb of the Mummy Priest before, and even though it’s a relatively small, uncomplicated module, I was surprised that we made it all the way through in about four hours. The Egyptian-themed setting was a nice change of pace from the vaguely Medieval European default fantasy setting. If this adventure were part of a campaign instead of a one shot, then I’d be tempted to use Stygia from Robert Howard’s Conan stories as the historical background for the tomb.
The players all had fun, and they also did very well, including the new guy, who by picking the thief had ended up with what is probably the the most challenging class to play from original D&D his first time out. I always make monster attack and damage rolls in the open, and I got a kick out of watching their reactions, and also how quickly their cockiness faded after their first, nearly disastrous run-in with the boss monster. Towards the end of the final, climactic battle, I moved from my seat behind the DM’s screen to get closer to the map that they were gathered around, and cheered along with them when they finally brought down the mummy priest. They’d really earned it.
-
As mentioned, Swords & Wizardry Complete (with cover art by Erol Otus!), and also my new print copy of Basic Fantasy RPG Core Rules to help me fill in some gaps in the S&W rules. ↩︎
-
The players do their own mapping in my games, and the “double tabloid”-sized paper gives them plenty of room to make it big enough for everyone to see. This particular pad is from Bienfang, but while the 11" x 17" tabloid size is relatively easy to find, the 17" x 22" isn’t. I got lucky and found it at a local Office Depot, but it doesn’t seem to be listed on their website anymore. ↩︎